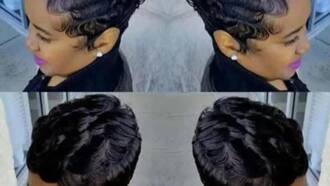
Straw curls on natural hair tutorial
There is a movement of most ladies becoming more appreciative of their African hair. This movement has created the need for more awareness of styles that are friendly for the texture of the African hair. Straw curls on natural hair are one of the styles that have become widely popular for natural African hair. This is because the straw set style is easy to manage and does not damage hair. The straw curl is also friendly to all lengths of hair.

Setting the straw set hairstyle on black hair is relatively simple. The most important thing is to ensure that the products used are of good quality. This can determine the end result of your curls and how long the curls last. The most important products are the setting lotion and conditioner. It is important to ensure that each step is followed and that the hair is given enough time to set to prevent it from freezing off.

READ ALSO: Latest loose box braids hairstyles
Steps you can follow to achieve the perfect straw curl
1. Wash the hair thoroughly

Source: UGC
The washing part is the first step in achieving a perfect straw set. This step is important for ensuring that excess oil and dirt is removed from the hair. This step facilitates the other steps by giving room for the styling product that will be used on the hair to thrive. The shampoo should be used generously to ensure that all the dirt and oils are removed. Ensure that the water used is warm to facilitate the removal of dirt.
READ ALSO: Beautiful afro twist braids hairstyles
2. Condition the hair

Source: UGC
Once the hair is clean, it is good to condition it so as to prevent breakage. Once you have applied the conditioner, use a wide-toothed comb to comb the hair from the bottom to the top. This will prevent loss of hair and breakage in the process. Once you are satisfied with the conditioning, rinse off the conditioner.

3. Apply the setting lotion

Source: UGC
Once the hair has been conditioned, the setting lotion is applied to the hair generously. You can use a wide-toothed comb to distribute the setting lotion evenly onto the hair. Ensure that when combing you still do it from the root upward. The setting lotion is always important since it protects the hair from damage by the heat of the drier. It also acts as an anti-breakage for the hair.
READ ALSO: 20 cute goddess braids hairstyles
4. Split the hair into sections

Source: UGC
In this step, the hair is split into different sections depending on how you would like the hair to be styled. The wide-toothed comb will still come in handy in this step. The main idea behind using a wide-toothed comb is to minimize hair breakage and loss. Always ensure that the hair is split into proportional sections depending on the style you hope to achieve. You can split the sections in front of a mirror to avoid having asymmetrical sections.

While splitting the hair into the sections, check to see if the scalp is clean enough or if some conditioner might still be stuck in the hair. If you come across any huge amounts of conditioner in the hair, you can give it a rinse to ensure that the hair is perfectly clean and ready for styling.
READ ALSO: Best natural hair braids styles
5. Curl the hair around the straws

Source: UGC
This is the main exercise in achieving a straw curl. In this step, the hair is curled from the ends to the roots on the straw. This is done gently to avoid any bumps on the hair. It is important to do this stage gently since the hair is moist and weak at this stage.
It might be necessary to do this in front of a mirror to avoid any bumps in the process of setting the hair. You can also add some more setting lotion onto the hair at this stage, just to be sure. The addition should only be done to the sections where the hair is thicker.

READ ALSO: Latest rasta braids styles 2018
How to do a straw set on short natural hair
For straw set on short hair, you can curl the hair, one section after the other to have the straws arranged in an organized way.
- You will need to undergo washing and conditioning of the hair.
- Split the hair into small sections to achieve strawed hair in good proportions.
- Use the smallest size of straws for short natural hair.
- Always ensure that the knot after the straw set on short natural hair is put in a way that it doesn’t come out in the setting process.
- The knot should also be put in carefully and not too tight to prevent the straw curls for short natural hair formed, from being skewed.
- You can have help at this stage in case you were doing it on your own. The help will save you from damaging your hair or ending up with broken hair.

READ ALSO: Natural bantu knots hairstyles
6. Allow the hair to dry inside a dryer
Once you are done setting the hair into the straws, it is time to enter go under a dryer to allow the hair to dry as the curls form. The drier should be set depending on the type of hair and whether the hair has been relaxed or not. If the hair had been relaxed, then it would need medium heat and a shorter time for the curls to form. For hair that is totally natural, the heat would be high and take a longer time for the curls to form well.
It is important to ensure that you do not move in and out of the drier too many times to prevent the hair from freezing. Settle in and relax with a magazine or with good music to prevent movement in and out of the drier.
READ ALSO: How to style finger waves hairstyles
7. Remove the straws carefully

Source: UGC
Once you are certain that the straw curls have formed fully, you can leave the drier and remove the straws. This will reveal the curls. You can now apply oil on the scalp to moisturize the roots and encourage hair growth. Do this gently to prevent the curls from damage. For longer hair, one must be extra careful since the curls are more susceptible to damage when the hair is longer. You can ask for help if you were doing it yourself, to ensure that you get the perfect curls.

Source: UGC
It is important to note that straw curls on relaxed hair generally last longer than on natural hair.
You can do a massage on the scalp at this stage to ease blood flow after the stress it has encountered under the drier and during the setting process. It is easier to remove straws used on short hair, since the straws can just be pulled from the side.

READ ALSO: Best weave hairstyles in Ghana
8. Spray and style the hair with bobby pins
Once you feel that the scalp has relaxed enough, you can use a wide-toothed comb to style the hair as desired. You can decide to style the hair as a mo-hawk, push-back or just leave it as it is. Once you have achieved the desired style, spray the hair with a good spray; like an olive-based one. The spray moisturizes the hair and allows it to breathe after the setting procedure.
Always ensure that you do not over-comb the straw curls, to prevent the curls from unraveling faster. Always choose a simple style that will not need a lot of combing. This can be like the push-back that only needs a ribbon.
READ ALSO: Latest loose braids rasta hairstyles
9. Daily management of the straw curl
The straw curl can be managed by running the fingers or a wide-toothed comb through it daily and spraying the curls with an olive oil-based spray. If you had used bobby pins to style it, then you can simply comb the area above the bobby pin and spray it. The straw set curls require minimum effort to manage. The straw setting hair lasts depending on the care that it is given. It is, however, a good way to maintain hair and to allow it to breathe. Always note that straw curls on short natural hair are likely to last for a maximum of two weeks. Straw curls last longer when the hair is longer.

READ ALSO: Best finger waves hairstyles in Ghana

Source: UGC
The expected result for the straw set hairstyles black hair that is a bit short should be similar except the length.
READ ALSO: Best perm cut hairstyles in Ghana
To get the best out of straw curls, always observe the following steps
- Avoid using pomade on straw setting natural hair, as this removes the curls faster. Also, avoid applying oil to the hair directly. Rather, apply the oil onto the scalp of the hair. This method of oiling the scalp will allow the hair to grow without damaging the straw curls thus allowing the curls to last longer.
- Do not comb into the straw curls hairstyle unless you are styling the hair. This will prevent you from damaging the curls early. Always use a wide-toothed comb when you need to style the hair.
- Always wear a shower cap when showering as water damages the curls.
- For short hair, the straws can be combed through by using the fingertips.
- Always spray the hair daily.

The straw curl on natural hair is an amazing way to style your natural African hair. As such, straw curls are easy to embrace and need minimum maintenance. You can even do the curls without going to a salon. Once you have all the products in place, you can easily do it at home. That is, if you have enough time to ensure that the curls come out perfectly. Although the curls last for a short time, you can enjoy the curls for the short time and redo the hairstyle later.
READ ALSO: Latest sister locks hairstyles
Source: YEN.com.gh